Fiat 124 Spider Forum banner

How To Install Turbo Thermal Blanket

58K views 126 replies 40 participants last post by  stefa  
#1 · (Edited)
How To Install Turbo Thermal Blanket​

Overview:
Turbo thermal blankets are used to wrap the exhaust side of the turbo and replace the OEM heat shield. While the heat shield does a decent job of reflecting radiant heat, a turbo thermal blanket is much more effective. Turbo thermal blankets have the benefit of reducing under-hood temperatures (which reduces heat soak and intake air temps), as well as extending the life of surrounding components. By keeping all of the heat inside the turbo, a turbo thermal blanket also keeps energy inside the turbo, which aids in making power by spooling the turbo faster and making it more efficient. This tutorial provides instructions for installing the Madness Autoworks Fiat 124 Spider Thermal Blanket.

Notes:
- Do not attempt to install the Thermal Blanket while the turbo is still hot as you may burn yourself.
- The Thermal Blanket may emit some smoke during the first few trips after installation, equivalent to a recently extinguished candle. This is normal and will subside after a several heat cycles.

Tools Required:
- 10mm wrench
- Ratchet with 10mm & 12mm sockets
- Ft/lb torque wrench
- Optional: in/lb torque wrench

Part Required:
Madness Autoworks Fiat 124 Spider Thermal Blanket

Procedure:
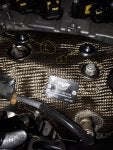
1. Remove the engine cover. There are three rubberized mounting points, shown below. Simply pull up on the cover, and it will snap out.
Image


2. Remove the 10mm nut holding the O2 sensor bracket on.
Image


3. Remove the following 12mm nuts and bolts.
Image


4. Remove the three 10mm bolts shown below. Use a 10mm wrench for the lower bolt. Once removed, you can lift the heat shield and set it aside.
Image


5. Remove the 10mm bolt shown below.
Image


6. Fit the Thermal Blanket over the turbo.
Image


7. Tuck the Thermal Blanket over the side of the heat shield bracket.
Image


Continued in next post...
 

Attachments

#2 · (Edited)
8. Using the bolts that came with your Thermal Blanket, loosely tighten the two upper bolts. Use one of the bolts you took off in step 4 where indicated below toward the bottom right.
Image


9. Using the third bolt provided with the Thermal Blanket or one of the bolts from step 4, loosely tighten the bolt at the side, then tighten all four bolts to approximately 25-30 in/lb (hand snug).
Image


10. Reinstall the turbo bracket, and tighten the bracket bolts shown to 18 ft/lb.
Image


11. Reinstall the O2 sensor bracket, and tighten the 10mm nut to approximately 25-30 in/lb (hand snug).
Image


12. Peel off the protective cover on the SILA Concepts plate.
Image


13. Reinstall the engine cover.
Image
 

Attachments

#5 ·
Nice job on the tutorial, thanks.

1st message, photo 5, below the single bolt you ID to remove, there is some sort of sensor(?) with wires coming out of it. The next photo, #6, as you are setting the blanket, we see the sensor going through a hole in the blanket. Did that sensor need to be removed, then fit the blanket, and then reinstall the sensor? Or does the blanket somehow wrap around that sensor without having to remove it?

Secondly, you really had that little smoke? In the other biggie turbo blanket thread (sorry for not linking that thread, please edit to insert it if possible) reports of smoke from this exact blanket are wide ranging, from minor smoke to grave concern from smoke nearly billowing out of the engine bay. Has the mfr. or supplier given any more in-depth information as to what is leading to the smoking? I am not starting a debate, I sincerely want to know what it is that is burning off, and why more with some of their blankets and less smoke with other samples. I will be installing one from the beginning of my ownership but I want to be a fully informed consumer of honest information.

Thanks for you effort here, much appreciated.

Steve.
 
  • Like
Reactions: Roadscum and NYProf
#7 ·
That's an oxygen sensor. You don't need to remove it, as there is a slot in the thermal blanket for it. If it had to be removed, I would have included that as part of the steps for the thermal blanket, as that requires an O2 sensor socket to remove.

Yes, I didn't have much smoke. Sure, you could smell it, but even with the engine bay open, you couldn't see more than a small stream of smoke coming out like what you'd get blowing out a candle or two. It wasn't billowing smoke or anything that anyone else would notice with the hood closed.

I'm wondering if someone maybe forgot to remove the little plastic protective cover on the SILA badge. I almost didn't realize it was there myself, since it doesn't cover the rivets of the badge, but I can't imagine it will hold up to much heat without burning.

I haven't heard anything from the manufacturer regarding the smoke. My best guess is that it's residual chemicals from the manufacturing process that are burning off.
 
#6 ·
Well, I guess this helps a bit, from the product description page at Madness (partial copy only),

-Titanium Fabric Outer Shell
-Calcium Magnesium Silicate Wool Inner Core
-High Temperature Silica Fabric
-Stainless Steel Capstan Rivets
-1 year manufacturer warranty against defects

Heat tolerance specs:

Interior Surface:
Maximum Temperature Rating: 2325°F/ 1270℃
Continuous Use Limit: 1835°F/ 1000℃

Exterior Surface:
Direct Contact Limit: 1810°F/ 989℃
Radiant Heat Limit: 2475°F/ 1378℃

So it seems the majority of the product components are quite heat resistant, taking temps higher than will melt some metals (engineeringtoolbox.com for melting point of metals), so some component, or maybe a byproduct of the manufacturing process itself, is off-gassing something that the retained heat from the turbo is hot enough to burn away.

Anyway, I didn't mean to derail this tutorial. But if you could let us know about that wired component from the early part of the installation, that would be helpful. Is it just a slot through the blanket that fits around that sensor? Thanks.

Steve.
 
#8 ·
#10 ·
Good, thanks guys for calming my nerves. I guess I should not worry about installing this one, esp. with no viable alternatives available at this time.

Steve.
 
#13 ·
Yeah, the 4th time I took the car out, I stopped smelling any hint of smoke at all. It's a sweet smell, almost likely a glycol burning (antifreeze, for example). It's not really that offensive of a smell, and it lessens each subsequent heat cycle you put it through.

This wasn't intended to be a review thread, but it's a quality product. It does what it claims to and reduces under-hood temperatures. I haven't had a chance to drive it long and hard enough to tell if there is a noticeable performance gain, but the science behind theoretical benefits is sound. The installation is simple and quick, and it's easy to revert back to stock if you need to take your car in for service.
 
#12 ·
XtremeRevolution,

Thank You from everyone here at MADNESS Autoworks for the time and effort and detailed install. We truly appreciate it and have listed the install instructions though our product listing on our website to allow future customers to see the tools and required work to install this product. Awesome Job and Thank You once again!
 
#14 ·
4. Remove the three 10mm bolts shown below. Use a 10mm wrench for the lower bolt. Once removed, you can lift the heat shield and set it aside.
Image


5. Remove the 10mm bolt shown below.
Image
Is the lower fastener a nut or a bolt? It looks like a nut on a stud, but in the next pic the stud is gone.

The weird bolt in pic 5, what is its purpose?
 
#19 ·
Mine must have been stuck on the stud pretty well then. Honestly I thought it was all one piece; I didn't look hard enough to realize it was just a nut on a stud.
 
#20 ·
The PTP blanket installs in a similar manner, but it comes with washers to use for the larger hole in the blanket. Also, the slot for the O2 sensor on the PTP appears to wrap around it more completely.
 
#95 ·
Interestingly enough, the PTP blanket that I just received and installed DID NOT have anything in the package other than some really insufficient instructions and the blanket itself. I'm going to be posting another reply that gets into some of the things I ran into, but the biggest issue is that the grommets for the holes closest to the ignition coils are so large that the factory bolt heads easily slide through them... and the bolts are too short to allow the use of a washer to hold things down. Is that what you experienced as well?
 
#21 ·
Question If I install the turbo blanket over
Quote:
Originally Posted by pikeman View Post
It doesn't matter whether you're at the north pole or Khartoum. It makes the turbocharger more efficient.
best regards
Pete
The heat shield, would that be ok? I am not looking for an increase in spool time, or increase in
X amount of horsepower. I want decrease in hear soak on surrounding plastic and rubber components.

If I leave the heat shield on, wouldn't this help additionally with controlling heat soak??

Is my logic correct or am I possibly causing a future problem down the road.

I'm getting the PDP blanket made in Texas.

Thanks for all responses
 
#22 · (Edited)
The turbo blanket replaces the function of, and adds additional benefits over the factory heat shield. It will indeed protect surrounding components from the effects of heat and will help reduce heat soak. I don't think it will do any good to leave the factory heat shield on.
 
#23 · (Edited)
Just installed PTP Blanket and left Factory Heat


Shield on. Yes, Xtream, you make lots of valid correct points, but as I stated, my goal was to reduce heat soak, plus I didn't feel comfortable with the blanket directly on the turbo, even though I know it is designed for that extreme.

Since I just moved back to Austin, Tx, I was able to stop by the Company Headquarters and pick it up and they included the hardware with the screws to fit over the blanket and the factory heat shield.
Yes, that bottom screw on the side was a bear to get threaded with the big washer, but I finally got it. Of course, taking the Factory shield off, would of yielded extra space to start the nut onto the bolt.
I like the 1/4" gap between the turbo and the Factory Heat shield, allowing some free flow of air over the turbo, along with my new blanket on top of it.
Another new step I do ,since I'm retired and always park in a closed garage, I now pop and prop my hood open when I come home, to allow additional heat to dissipate from the engine bay.

The PTP Lava blanket is top grade material and workmanship. It is worth every penny.
Not Sure
 
#24 ·
Someone can correct me if I've got my physics wrong, but the stock aluminum head shield I think is mainly for reflecting radiant heat, and will provide little value smashed up against a turbo blanket.

Edit: or, are you saying you placed the blanket over the factory heat shield? If that's the case, I think it would greatly reduce the value of the blanket.
 
#25 ·
Shark...I placed the blanket over


The Factory Heat shield. If for you, the meaning of "reduced the value of the blanket" means, I will not get a hotter turbo and thus not increase the revolution and faster spinn up, plus all the other points made by Xtream, then you are correct.

My Main Goal was to protect my peripheral components in close proximity to the turbo, from heat soak and related damage for the long hall.

In that regard, I think the blanket plus the Factory Heat shield combination is a good solution, and of course propping the hood. I plan to pass this car on to my Grandson.
Thanks.
 
#35 ·
" No, they don't completely encapsulate the turbo, but they do a much better job than not having one at all, and certainly better than having only a heat shield in place"

Now this is a statement we should be all in agreement with...Peace...

Not Sure.
 
#40 ·
Unfortunately, you can't tuck the blanket between the bracket and the turbo. You will be left with nothing to bolt the blanket down to, and the blanket would be up against the moving parts of the wastegate.

An ideal blanket would be one that completely encapsulated the turbine housing, one that would require removal of the turbo. But, that's not what we are getting here.
 
#42 ·
Shark is right. Between the bracket and turbo will interfere with the waste gate mechanism. Between the bracket and the valve cover is the recommended method according to the vendor's instructions for the Sila blanket. This also provides a means of bolting up that side of the blanket as Shark pointed out, to the heat shield bracket.
 
#48 ·
So far I have a 1k km and the catch oil can is dry and oil level is to its maximum. Still not too much hot weather here, In 4 days, daylight time will start dipping, and summer has not settle yet, My Scatoletta is already counting days where she will be put asleep.:eek::crying:
 
#51 ·
I received the PTP turbo blanket, it came with 3 bolts and 3 washers. I was able to use only the 3 washers and 2 bolts. On #3 I was able to use only the washer cause only the nut came out. Only problem I had was removing nut -3 . Had to loosen and remove the stablelizing bar to remove the 3rd nut.

I followed the Sila blanket installation.

Anyway here is a picture of the blanket with the washers. I did not re-install the The EOM heat shield and make sure I did not drop any bolts and nuts.
 

Attachments

#52 ·
I received the SILA turbo blanket, sans bolts that mount to the heat shield bracket; so far the only one I've been able to reuse is the nut/threaded stud on the turbo housing towards the bottom.

Hopefully the supplier will send the missing bits.
 
  • Like
Reactions: GregtheBike
#53 ·
mine came w/o bolts too
I just reused all the bolts I took off & it was fine
when I contacted them about it they said:

Wanted to email you back and let you know that the bolts supplied with the turbo blanket (as you now know) are not required for installation. We supply them for those DIY'ers that aren't all that skilled with installing aftermarket parts. What I mean is the bolts we supply are 5mm longer than the OEM bolts. This makes it easier to start the bolt after the blanket has been installed (added thickness of the blanket) but they are not required. If you need anything else please let me know. I'll get back to you ASAP.
so I just left it at that...
 
#54 ·
Okay, I had some difficulty with reusing the topmost heat shield bolts, and left them off, such that the blanket is resting on top of the heat shield bracket.

I should make an effort to get those bolts mounted.
 
#56 ·
I took off the heat shield. Still, I found the stock bolts too short to affix the blanket to the heat shield bracket up top.

Instead, I ordered a pair of M6-1.0x20mm hex flange bolts from this company.

Worked like a charm.
 
#57 ·
Just wanted to briefly report back on the SILA blanket.

The blanket definitely keeps under-hood temperatures lower, even by touching components in the engine bay after running. However, there is white residue on nearby engine bay components, a side-effect I think the manufacturer should have disclosed. I hear the PTP blanket doesn't have this problem, so I'll probably replace this at some point as it will get old having to wash the engine bay.